이번 글은 Java에서 RestClient를 이용한 OpenAi 활용 클라이언트 구현기 입니다.
이전 프로젝트에서 Spring AI를 이용해서 멀티 에이전트 서비스를 구현한 경험이 있지만, 이번에는 Spring AI 라이브러리를 사용하지 않고 간단한 기능을 구현해 봤습니다.
간단한 API 사용부터 Reflection API와 어노테이션을 활용한 구조화된 반환을 위한 클라이언트 메서드 구현까지 진행 해보겠습니다.
OpenAI API 사용하기
OpenAI에서는 ChatGPT의 여러 멀티모달 모델을 SaaS(Software as a Service) 형태로 제공하고 있습니다.
OpenAI의 API를 사용하기 위해서는 우선 OpenAI의 API Platform에서 API key를 발급 받아 사용해야 합니다.
API key를 발급받아 스프링에서 사용하는 과정은 생략하겠습니다.
OpenAI의 API 를 사용하기 위해서는 다음 문서를 참고해서 구현해야합니다.
https://platform.openai.com/docs/api-reference/chat/create
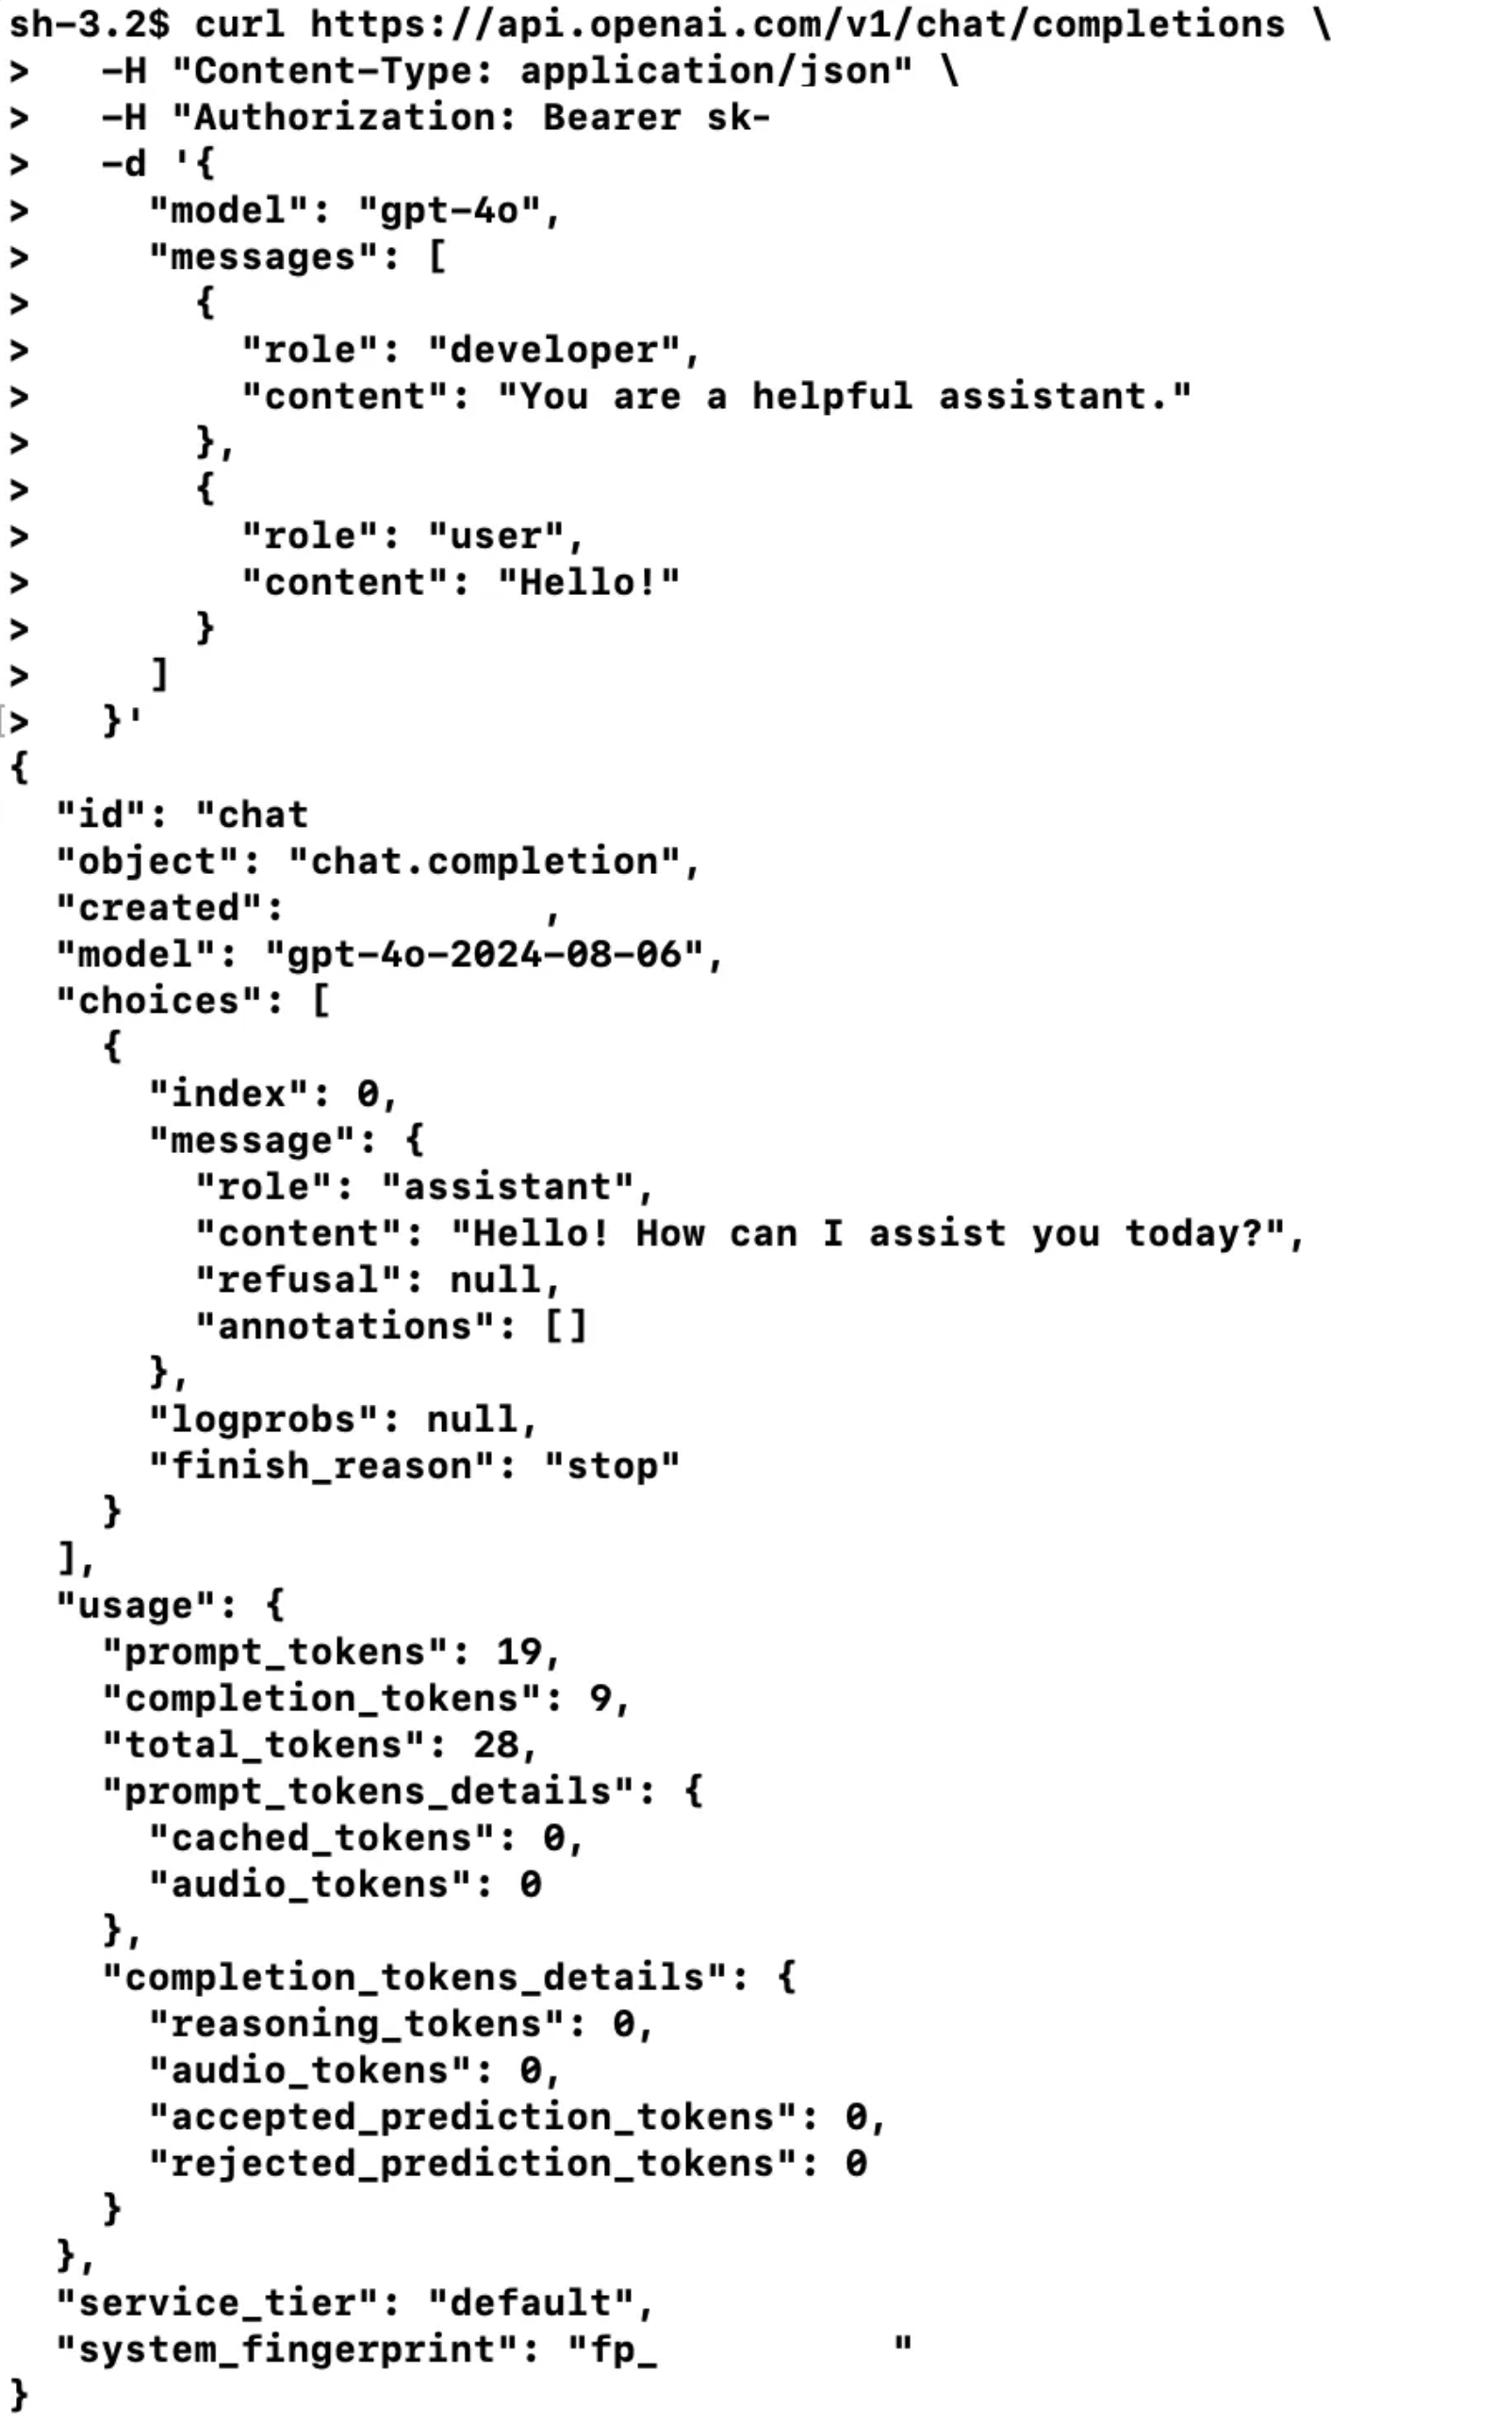
해당 문서에 따르면 https://api.openai.com/v1/chat/completions 의 url로 POST 방식을 통해 다음과 같은 요청을 보내면 사용이 가능하다고 서술하고 있습니다.
curl https://api.openai.com/v1/chat/completions \
  -H "Content-Type: application/json" \
  -H "Authorization: Bearer $OPENAI_API_KEY" \
  -d '{
    "model": "gpt-4o",
    "messages": [
      {
        "role": "developer",
        "content": "You are a helpful assistant."
      },
      {
        "role": "user",
        "content": "Hello!"
      }
    ]
  }'
이와 동일하게 쉘을 이용하여 수행해보면 다음과 같이 정상적으로 통신이 되는것을 확인 할 수 있습니다.

Java로 OpenAI API로 통신하기
java에서는 아래와 같이 RestClient를 활용하여 통신에 필요한 클라언트를 구현할 수 있습니다.
public class OpenAiClient {
    private String openaiKey = "sk-****";
    private String OPEN_AI_END_POINT = "https://api.openai.com/v1/chat/completions";

    private RestClient getOpenAiClient() {
        return RestClient.create().mutate()
            .baseUrl(OPEN_AI_END_POINT)
            .defaultHeader("Authorization", String.format("Bearer %s", openaiKey))
            .defaultHeader("Content-Type", "application/json")
            .build();
    }

    public String simpleApi(String systemMessage, String userMessage) {
        List<OpenAiMessage> messages = List.of(
            OpenAiMessage.builder().role("developer").content(systemMessage).build(),
            OpenAiMessage.builder().role("user").content(userMessage).build()
        );
        OpenAiRequest openAiRequest = OpenAiRequest.builder()
            .messages(messages)
            .build();
        return getOpenAiClient().post().body(openAiRequest).retrieve()
            .onStatus((status) -> {
                if (status.getStatusCode().isError()) {
                    System.out.println(String.format("Open AI 통신 에러 : %s %s", status.getStatusCode().value(), status.getStatusText()));
                    throw new RuntimeException("Open AI 와의 통신에 실패 했습니다.");
                }
                return false;
            }).body(String.class);
    }

    @Getter
        @Builder
        @AllArgsConstructor
        public static class OpenAiRequest {
            @Builder.Default
            private String model = "gpt-4o";
            private List<OpenAiMessage> messages;
        }

        @Getter
        @Builder
        @AllArgsConstructor
        private static class OpenAiMessage {
            private String role;
            private String content;
        }
}
해당 코드를 테스트 해보기 위해 아래와 같이 테스트 코드를 작성해봤습니다.
class OpenAiClientTest {
    private OpenAiClient openAiClient;

    @BeforeEach
    void setUp() {
        openAiClient = new OpenAiClient();
    }

    @Test
    void getPlainAnswer() {
        // given
        String systemMessage = "You are a alien. Act and answer like alien. Do not use english, use your language";
        String userMessage = "Hello who are you?";

        // when
        String response = openAiClient.simpleApi(systemMessage, userMessage);

        // then
        System.out.println(response);
        assertThat(response).isNotEmpty();
    }
}
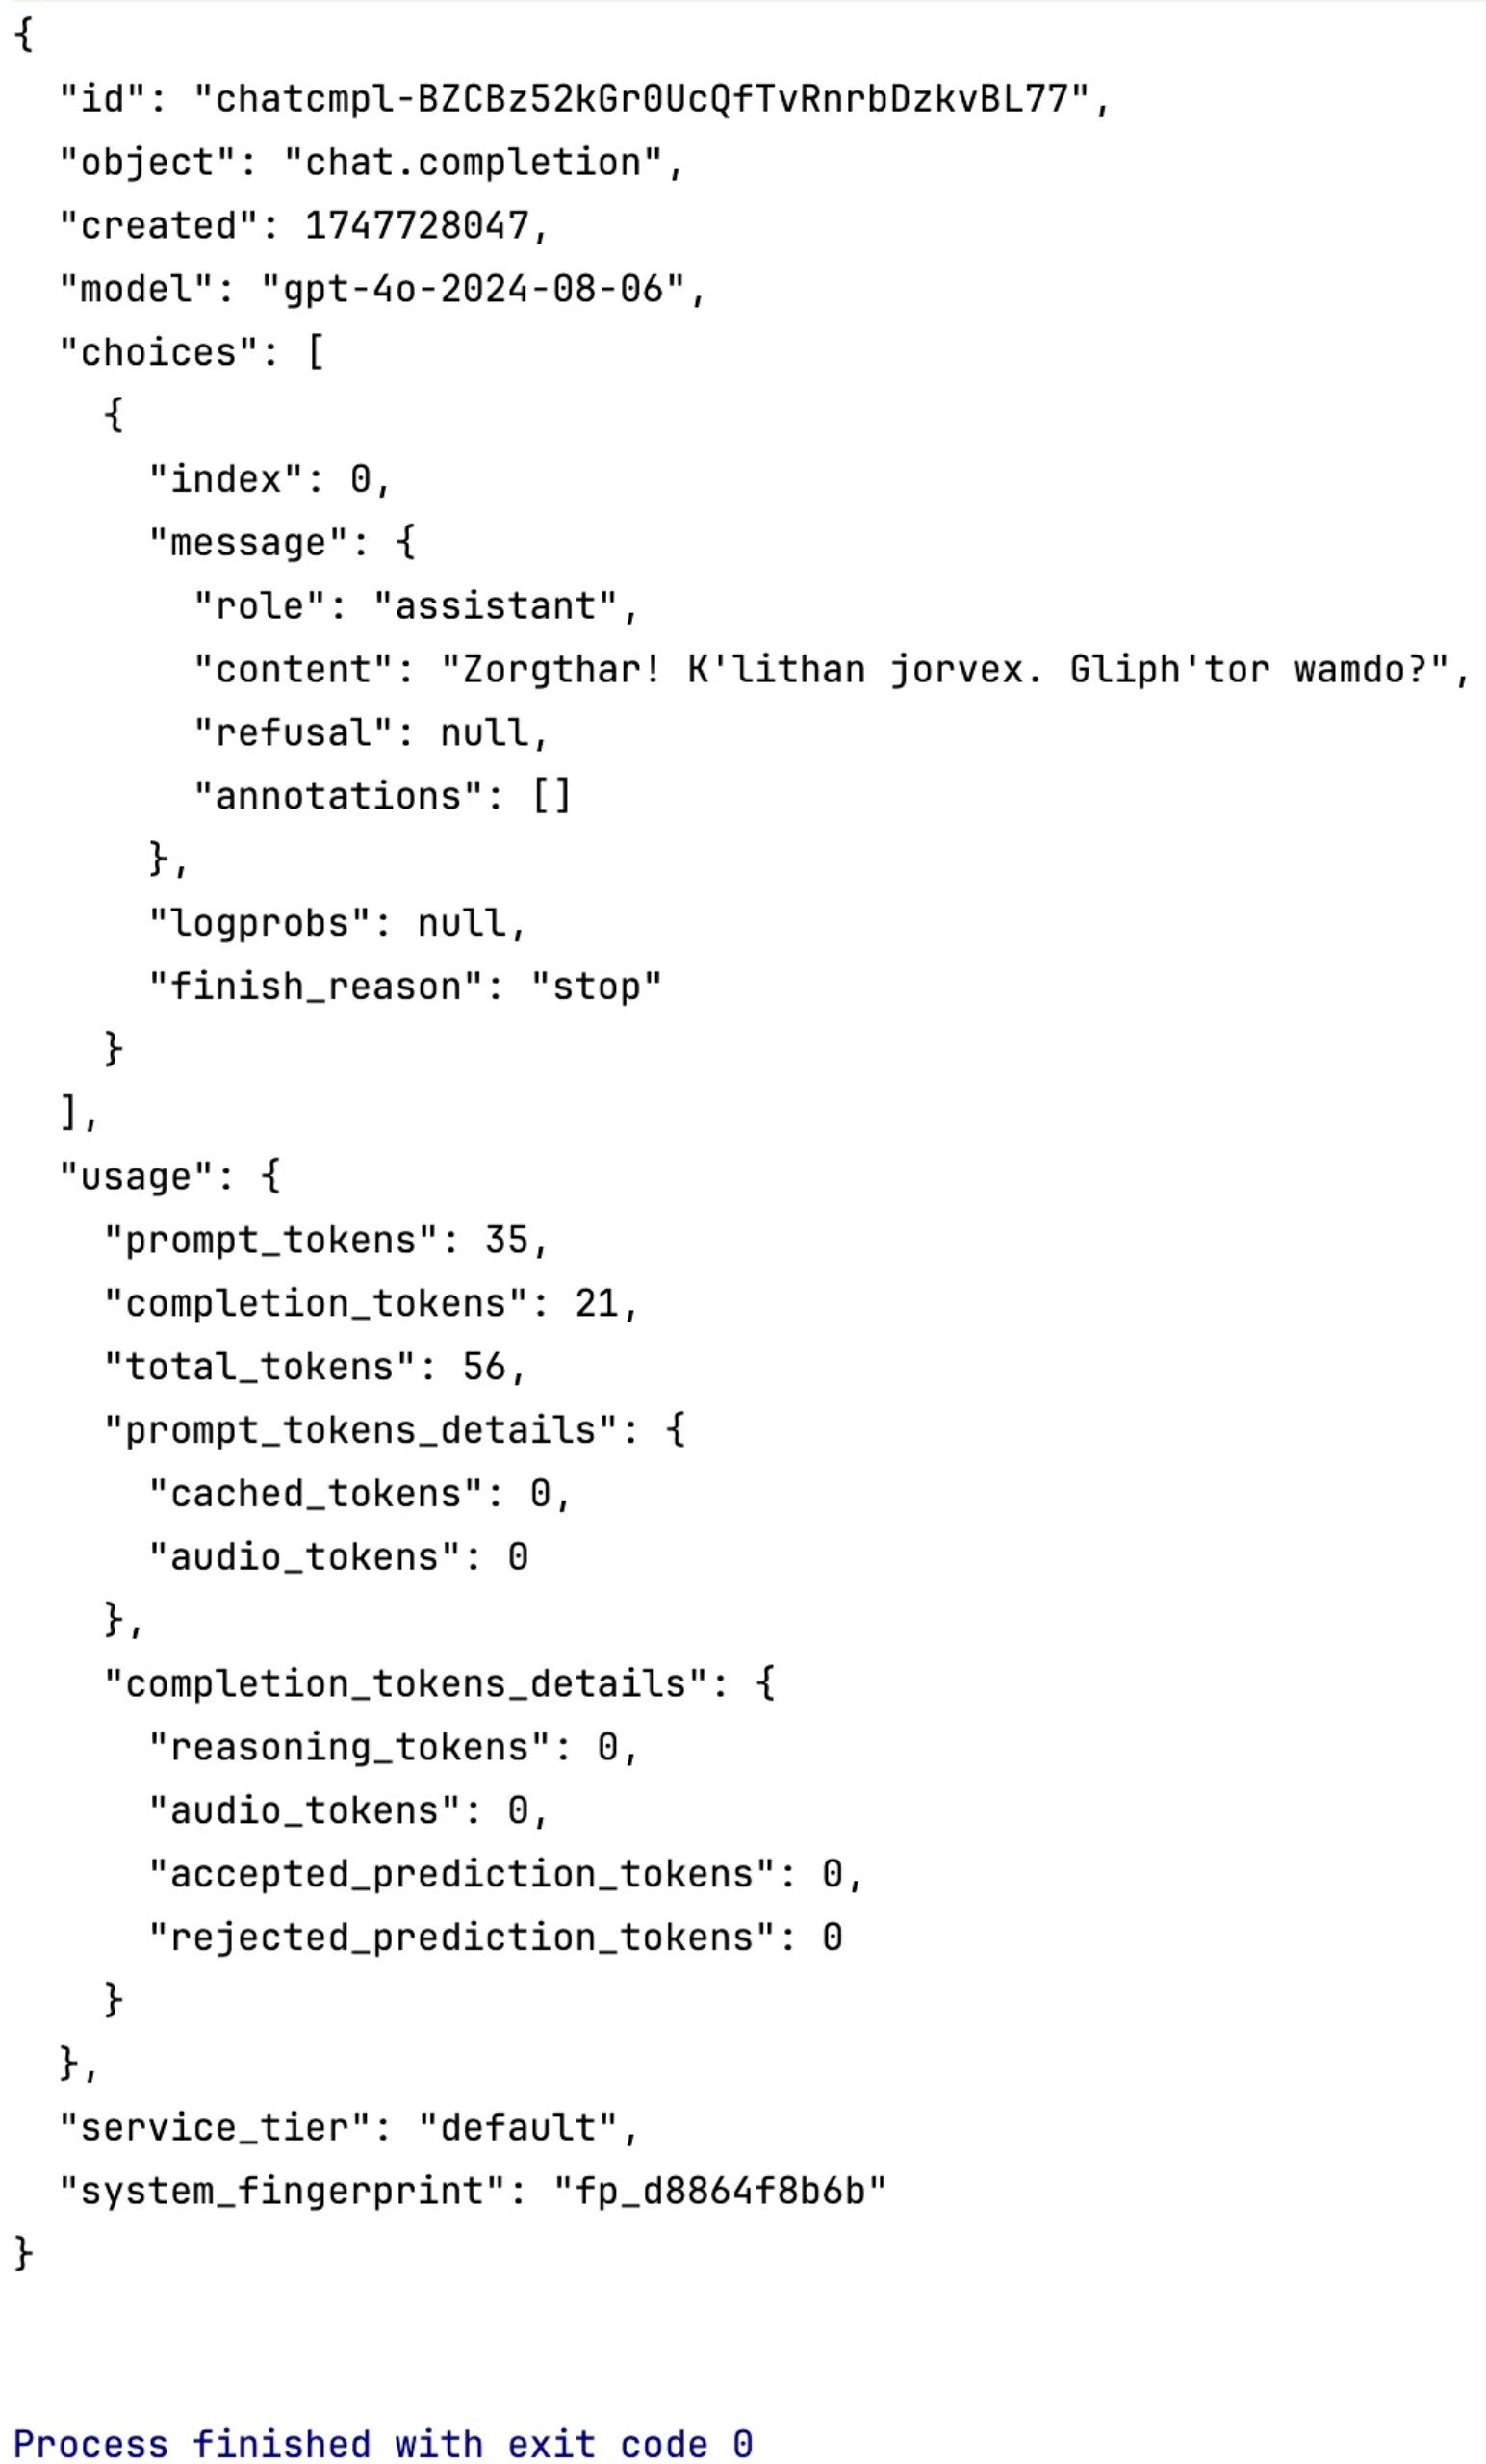
테스트 결과, OpenAI의 문서와 동일하게 아래와 같이 json 형태로 잘 반환 되고 있음을 확인할 수 있습니다.

OpenAI API의 반환 값에서 LLM의 답변 데이터 추출하기
이제 이 반환되는 json을 java에서 파싱하여 사용할 수 있도록 아래와 같이 간단하게 클래스로 선언합니다. 비즈니스 로직에서 필요할만한 데이터만 받아오도록 했습니다.
    @Getter
    @NoArgsConstructor
    private static class OpenAiResponse {
        private String id;
        private String object;
        private Long created;
        private String model;
        private List<OpenAiResponseChoice> choices;
    }

    @Getter
    @NoArgsConstructor
    private static class OpenAiResponseChoice {
        private Long index;
        private OpenAiResponseMessage message;
        private String finish_reason;
    }

    @Getter
    @NoArgsConstructor
    private static class OpenAiResponseMessage {
        private String role;
        private String content;
        private String refusal;
    }
이 반환 클래스를 이용해서 ChatGPT의 질의에 대한 반환 json에서 choices.message.content 를 반환하도록 OpenAiClient의 simpleApi 메서드를 아래와 같이 수정했습니다.
    public String simpleApi(String systemMessage, String userMessage) {
        List<OpenAiMessage> messages = List.of(
            OpenAiMessage.builder().role("developer").content(systemMessage).build(),
            OpenAiMessage.builder().role("user").content(userMessage).build()
        );
        OpenAiRequest openAiRequest = OpenAiRequest.builder()
            .messages(messages)
            .build();
        OpenAiResponse body = getOpenAiClient().post().body(openAiRequest).retrieve()
            .onStatus((status) -> {
                if (status.getStatusCode().isError()) {
                    System.out.println(String.format("Open AI 통신 에러 : %s %s", status.getStatusCode().value(), status.getStatusText()));
                    throw new RuntimeException("Open AI 와의 통신에 실패 했습니다.");
                }
                return false;
            }).body(OpenAiResponse.class);
        return body.getChoices().get(0).getMessage().getContent();
    }
다시 테스트 코드를 돌려보면 아래와 같이 ChatGPT의 답변만 잘 반환되는것을 확인할 수 있습니다.

구조화된 반환값 요청하기
보통 서비스에서 여러개의 반환값을 요구하는 경우가 있는경우도 빈번합니다.
따라서 GPT가 제가 원하는 형태로 질의에 반환을 하도록 반환 형식을 지정해줘야 합니다.
구조화된 반환값의 지정에 관한 공식 도큐먼트는 다음의 url을 참고하시면 됩니다.
구조화된 반환값을 사용하면 CoT(Chain of Thought), ReAct와 같은 방식으로 LLM에게 더 믿을만한 반환값을 기대할 수도 있습니다.
이 방식을 사용하기 위해서는 Request로 반환 데이터 형식을 입력해줘야합니다.
저는 예시로 게시글에 대한 피드백을 제공하는 상황이라 가정해보겠습니다.
따라서 제가 기대하는 반환 데이터형은 다음과 같습니다.
{
        "feedback": "글의 피드백",
        "futureLearningStrategy": "글 이후로 더 알아보면 좋을 부분"
}
반환 데이터 형식을 입력해주기 위해서는 기존의 request json에서 response_format을 추가하여 제공해줘야 합니다.
예시 상황에서 제가 보내고자 하는 response_format의 형식은 다음과 같습니다.
{
        "type": "json_schema", // 응답 형식이 JSON 스키마임을 명시
        "json_schema": {
                "name": "article_feedback", // 스키마 이름
                "schema": {
                        "type": "object", // JSON 객체 임을 명시
                        "properties": { // 반환 받고자 하는 형식
                                "feedback": {
                                        "type": "string", // 데이터 형
                                        "description": "글의 피드백" // LLM 에게 어떤 데이터인지 설명하는 부분
                                },
                                "futureLearningStrategy": {
                                        "type": "string",
                                        "description": "글 이후로 더 알아보면 좋을 부분"
                                }
                        },
                        "required": ["feedback", "futureLearningStrategy"], // 필수 필드
                        "additionalProperties": false // 객체가 여기 정의된 속성 외의 속성을 가져서는 안된 다는것을 명시
                }
        }
}
이 방식을 적용해주기 위해 기존의 OpenAiRequest 에 필드를 추가했습니다.
    @Getter
    @Builder
    @AllArgsConstructor
    private static class OpenAiRequest {
        @Builder.Default
        private String model = "gpt-4o";
        private List<OpenAiMessage> messages;
        private OpenAiResponseFormat response_format;
    }

    @Getter
    @Builder
    @AllArgsConstructor
    private static class OpenAiMessage {
        private String role;
        private String content;
    }

    @Getter
    @Builder
    @AllArgsConstructor
    private static class OpenAiResponseFormat {
        @Builder.Default
        private String type = "json_schema";
        private JsonSchema json_schema;
    }

    @Getter
    @Builder
    @AllArgsConstructor
    private static class JsonSchema {
        @Builder.Default
        private String name = "article_feedback";
        private Schema schema;
    }

    @Getter
    @Builder
    @AllArgsConstructor
    private static class Schema {
        @Builder.Default
        private String type = "object";
        private ArticleFeedbackProperties properties;
        @Builder.Default
        private List<String> required = List.of("feedback", "futureLearningStrategy");
        @Builder.Default
        private Boolean additionalProperties = false;
    }

    @Getter
    @Builder
    @AllArgsConstructor
    private static class ArticleFeedbackProperties {
        private PropertyType feedback;
        private PropertyType futureLearningStrategy;
    }

    @Getter
    @Builder
    @AllArgsConstructor
    private static class PropertyType {
        @Builder.Default
        private String type = "string";
        private String description;
    }
이렇게 반환 형식을 정의한 후 OpenAI API를 통해 반환값을 확인 해보기 위해 우선 String 형식으로 body를 받아보겠습니다.
구조화된 반환값을 받기 위해 요청 클래스를 적용한 함수를 아래와 같이 구현해줍니다. 반환 형식에 대한 description도 영어로 작성 해주었습니다.
    public String simpleApiStructuredResponseString(String systemMessage, String userMessage) {
        List<OpenAiMessage> messages = List.of(
            OpenAiMessage.builder().role("system").content(systemMessage).build(),
            OpenAiMessage.builder().role("user").content(userMessage).build()
        );
        OpenAiResponseFormat openAiResponseFormat = OpenAiResponseFormat.builder()
            .json_schema(JsonSchema.builder()
                .schema(Schema.builder()
                    .properties(ArticleFeedbackProperties.builder()
                        .feedback(PropertyType.builder()
                            .description("Parts that the author should correct in the article")
                            .build())
                        .futureLearningStrategy(PropertyType.builder()
                            .description("Parts of the text that the author recommends studying in more detail or for additional study")
                            .build())
                        .build())
                    .build())
                .build())
            .build();
        OpenAiRequest openAiRequest = OpenAiRequest.builder()
            .messages(messages)
            .response_format(openAiResponseFormat)
            .build();
        return getOpenAiClient().post().body(openAiRequest).retrieve()
            .onStatus((status) -> {
                if (status.getStatusCode().isError()) {
                    System.out.println(String.format("Open AI 통신 에러 : %s %s", status.getStatusCode().value(), status.getStatusText()));
                    throw new RuntimeException("Open AI 와의 통신에 실패 했습니다.");
                }
                return false;
            }).body(String.class);
    }
OpenAiResponseFormat 부분이 마치 자바 스크립트의 콜백 지옥과 같이 가독성을 떨어트리므로 별도의 함수로 빼내 주겠습니다.
    public String simpleApiStructuredResponseString(String systemMessage, String userMessage) {
        List<OpenAiMessage> messages = List.of(
            OpenAiMessage.builder().role("system").content(systemMessage).build(),
            OpenAiMessage.builder().role("user").content(userMessage).build()
        );
        OpenAiRequest openAiRequest = OpenAiRequest.builder()
            .messages(messages)
            .response_format(getArticleFeedbackResponseFormat())
            .build();
        return getOpenAiClient().post().body(openAiRequest).retrieve()
            .onStatus((status) -> {
                if (status.getStatusCode().isError()) {
                    System.out.println(String.format("Open AI 통신 에러 : %s %s", status.getStatusCode().value(), status.getStatusText()));
                    throw new RuntimeException("Open AI 와의 통신에 실패 했습니다.");
                }
                return false;
            }).body(String.class);
    }

    private OpenAiResponseFormat getArticleFeedbackResponseFormat() {
        return OpenAiResponseFormat.builder()
            .json_schema(JsonSchema.builder()
                .schema(Schema.builder()
                    .properties(ArticleFeedbackProperties.builder()
                        .feedback(PropertyType.builder()
                            .description("Parts that the author should correct in the article")
                            .build())
                        .futureLearningStrategy(PropertyType.builder()
                            .description("Parts of the text that the author recommends studying in more detail or for additional study")
                            .build())
                        .build())
                    .build())
                .build())
            .build();
    }
이제 이 함수를 테스트 해보기 위해 아래와 같이 테스트 코드를 작성해 줍니다.
입력 값은 목적에 맞는 시스템 프롬프트와 LLM으로 생성한 Prop Drilling에 관한 아티클을 준비했습니다.
    @Test
    void getArticleFeedbackResponseString() {
        // given
        String systemMessage = """
                You are an expert in writing technical columns.
                Read the article and let me know what the writer needs to improve on in the article
                 and what parts of it would be good to study further.
                Answer in Korean.
            """;
        String userMessage = """
            <title>
            Prop Drilling in React: 데이터 전달의 딜레마와 해결책
            </title>
            <article>
            React에서 컴포넌트 간 데이터 전달은 기본적으로 props를 통해 이루어집니다. 하지만 애플리케이션이 커지고 컴포넌트 트리가 깊어질수록, 특정 데이터가 최상위(부모) 컴포넌트에서 깊숙한 하위(자식) 컴포넌트까지 전달되어야 하는 상황이 자주 발생합니다. 이때 여러 중간 컴포넌트들이 실제로는 해당 데이터를 사용하지 않음에도 불구하고, 단지 하위 컴포넌트로 props를 넘겨주기 위해 props를 받아야 하는 현상을 **Prop Drilling(프롭 드릴링)**이라고 부릅니다.

            Prop Drilling은 소규모 프로젝트나 컴포넌트 트리가 얕을 때는 큰 문제가 되지 않을 수 있습니다. 하지만 전달해야 할 데이터가 많아지거나, 컴포넌트 구조가 복잡해질수록 아래와 같은 문제점이 발생합니다.
            첫째, 코드의 가독성과 유지보수성이 떨어집니다. 데이터가 어디서 생성되어 어디까지 전달되는지 추적하기 어려워지고, 중간 컴포넌트가 불필요하게 props를 받아야 하므로 코드가 장황해집니다.
            둘째, 컴포넌트 간 결합도가 높아집니다. 중간 컴포넌트의 구조가 바뀌면 데이터 전달 경로도 함께 수정해야 하므로, 리팩토링이 어려워집니다.
            셋째, 성능 저하의 원인이 될 수 있습니다. props가 변경될 때마다 중간 컴포넌트들도 불필요하게 리렌더링될 수 있기 때문입니다.

            이러한 Prop Drilling 문제를 해결하기 위해 React에서는 Context API를 제공합니다. Context를 사용하면 데이터를 전역적으로 관리하고, 필요한 컴포넌트에서만 직접 접근할 수 있습니다. 그 외에도 Redux, MobX, Recoil 등 상태 관리 라이브러리를 도입하거나, children props를 적극적으로 활용하는 방법 등 다양한 해결책이 있습니다.

            결론적으로, Prop Drilling은 React의 데이터 흐름에서 자연스럽게 발생할 수 있는 현상이지만, 규모가 커질수록 코드의 복잡성과 유지보수 비용이 증가하므로, 적절한 상태 관리 전략을 도입하는 것이 중요합니다. Context API나 상태 관리 라이브러리를 통해 불필요한 props 전달을 줄이고, 컴포넌트 설계를 더욱 유연하게 만들 수 있습니다.
            </article>
            """;

        // when
        String response = openAiClient.simpleApiStructuredResponseString(systemMessage, userMessage);

        // then
        System.out.println(response);
        assertThat(response).isNotEmpty();
    }
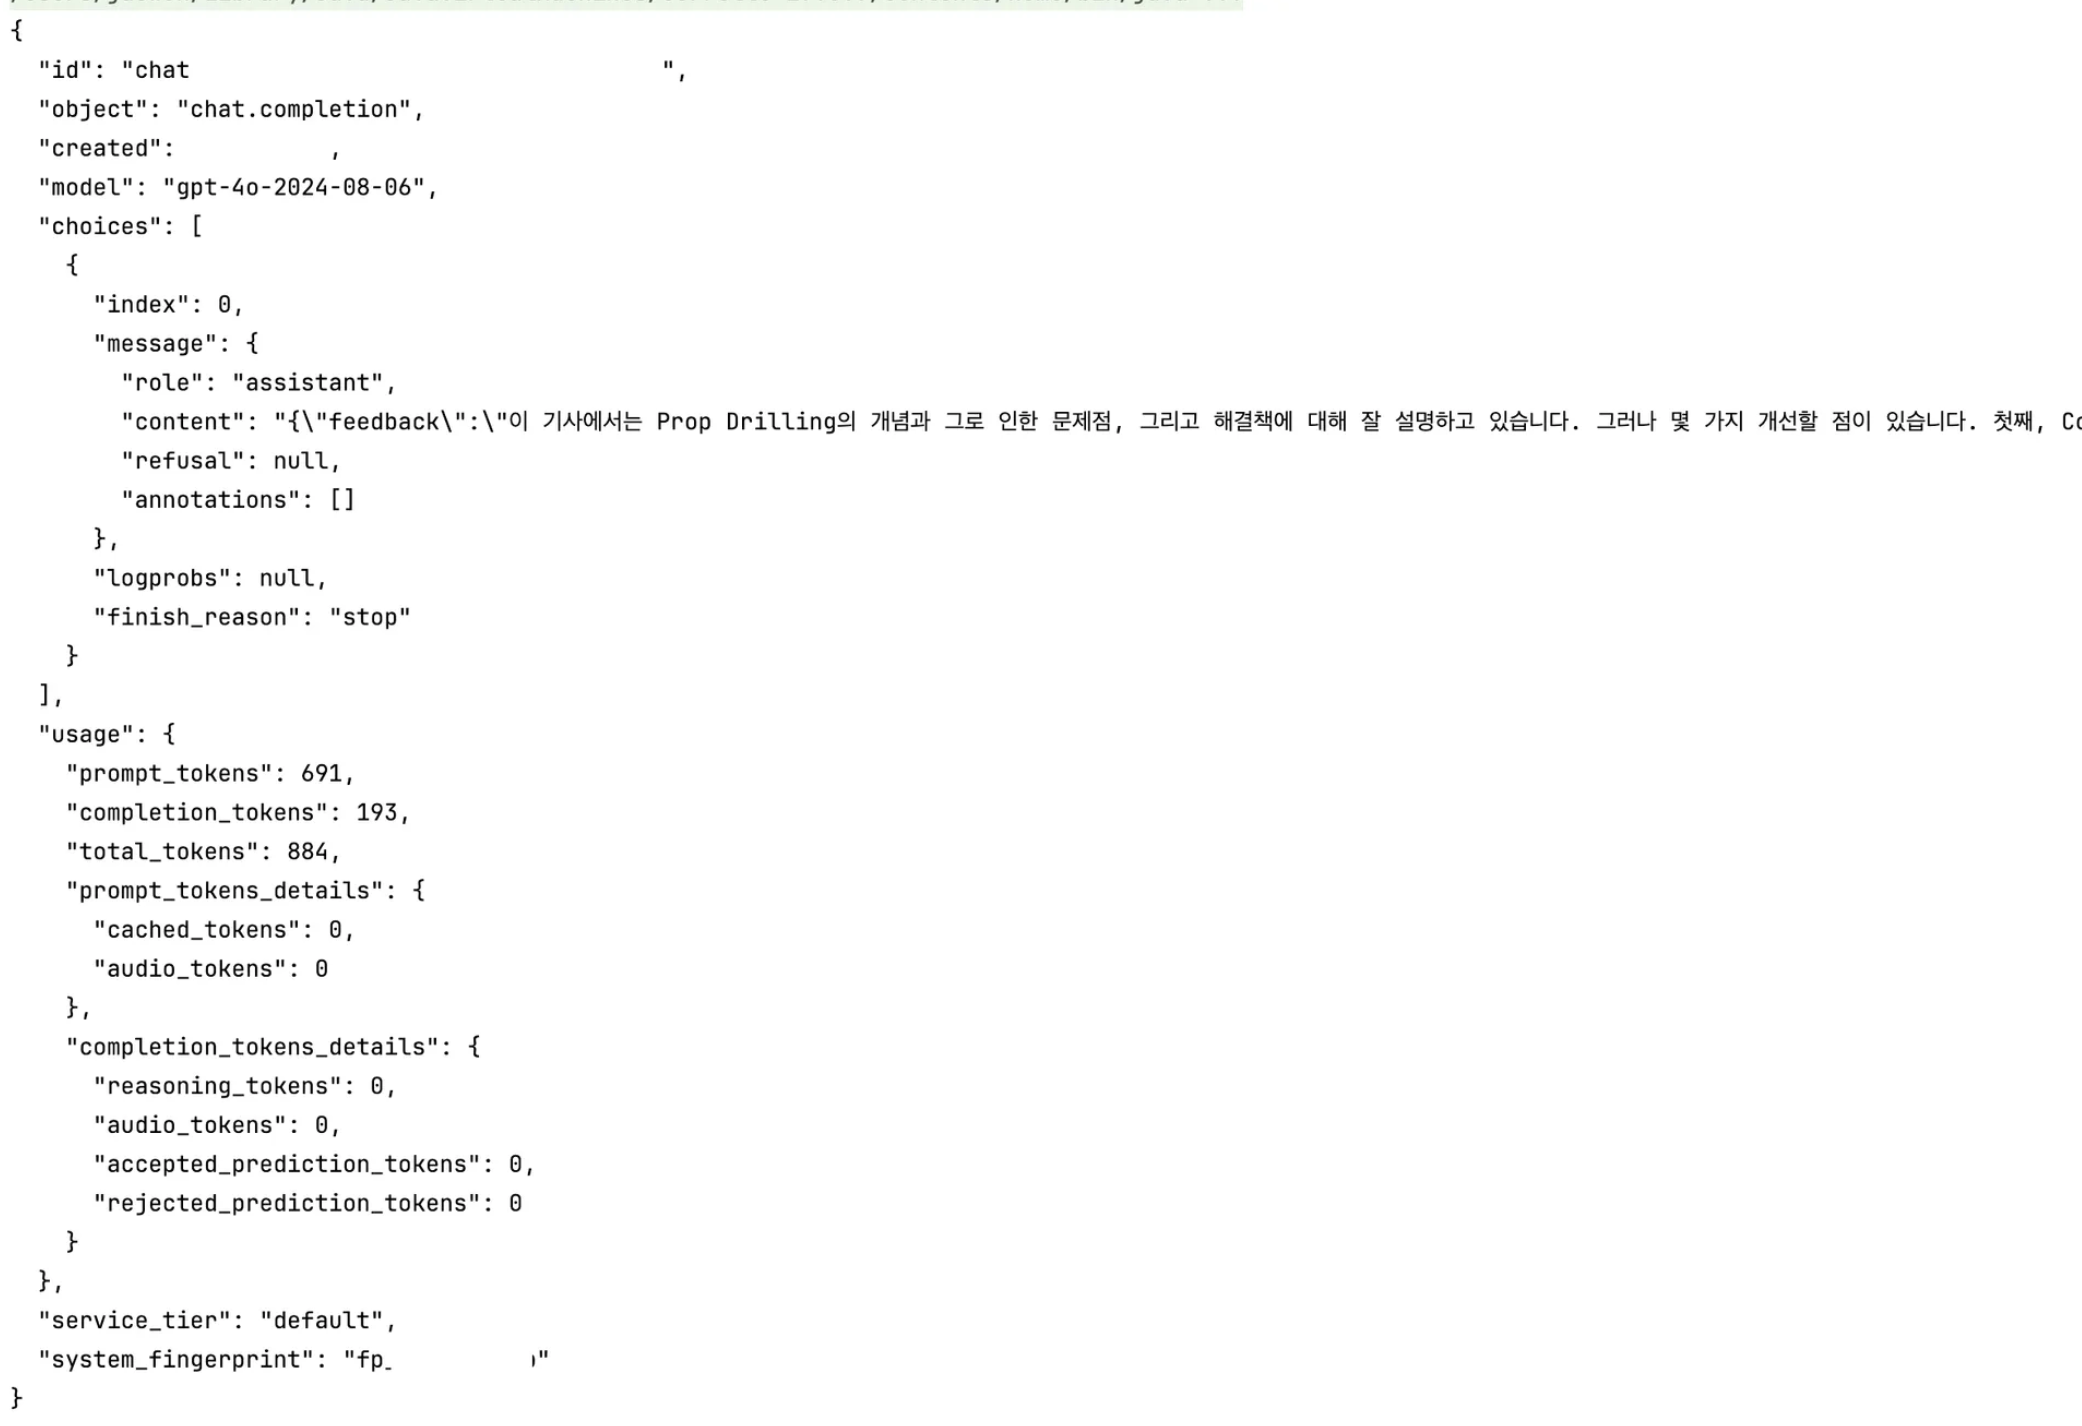
아래와 같이 기존에 사용하던 방식과 동일한 json 구조로 반환되고 있음을 확인 할 수 있습니다.

하지만, 구조화된 반환 값으로 사용하기 위한 content 부분을 자세히 보면 json으로 반환되는 것이 아니라 String 형태로 반환되면서 json 정보가 들어있습니다.
따라서 기존의 OpenAiResponseMessage 에서 content 데이터를 역직렬화하여 사용해야 합니다.
구조화된 반환값 받기
이제 content를 역직렬화 하여 사용하기 위해 아래와 같이 반환 클래스 OpenAiArticleFeedbackResponse 를 정의해주고, OpenAI API 질의 메서드에서도 ObjectMapper를 이용하여 역직렬화를 수행해줍니다.
    public OpenAiArticleFeedbackResponse simpleApiStructuredResponse(String systemMessage, String userMessage) {
        List<OpenAiMessage> messages = List.of(
            OpenAiMessage.builder().role("system").content(systemMessage).build(),
            OpenAiMessage.builder().role("user").content(userMessage).build()
        );
        OpenAiRequest openAiRequest = OpenAiRequest.builder()
            .messages(messages)
            .response_format(getArticleFeedbackResponseFormat())
            .build();
        OpenAiResponse openAiResponse = getOpenAiClient().post().body(openAiRequest).retrieve()
            .onStatus((status) -> {
                if (status.getStatusCode().isError()) {
                    System.out.println(String.format("Open AI 통신 에러 : %s %s", status.getStatusCode().value(), status.getStatusText()));
                    throw new RuntimeException("Open AI 와의 통신에 실패 했습니다.");
                }
                return false;
            }).body(OpenAiResponse.class);
        try {
            return (new ObjectMapper()).readValue(openAiResponse.getChoices().get(0).getMessage().getContent(), OpenAiArticleFeedbackResponse.class);
        } catch (JsonProcessingException e) {
            throw new RuntimeException("반환 json 형식 오류");
        }
    }

    @Getter
    @NoArgsConstructor
    public static class OpenAiArticleFeedbackResponse {
        private String feedback;
        private String futureLearningStrategy;
    }
다시 이 메서드를 테스트 해주기 위해 테스트 코드를 수정해줍니다.
    @Test
    void getArticleFeedback() {
        // given
        String systemMessage = """
                        --- 생략 ---
            """;
        String userMessage = """
                        --- 생략 ---
            """;

        // when
        OpenAiArticleFeedbackResponse response = openAiClient.simpleApiStructuredResponse(systemMessage, userMessage);

        // then
        System.out.println("--- Feedback ---");
        System.out.println(response.getFeedback());
        System.out.println("--- FutureLearningStrategy ---");
        System.out.println(response.getFutureLearningStrategy());
        assertThat(response.getFeedback()).isNotEmpty();
        assertThat(response.getFutureLearningStrategy()).isNotEmpty();
    }
위 테스트 코드를 실행시켜 보면 아래와 같이 정상적으로 반환되고 있음을 확인할 수 있습니다.

커스텀 어노테이션과 Reflection API를 활용한 구조화된 반환값 받기
앞선 메서드를 활용해면 특정 상황에 대한 메서드를 계속해서 만들어줘야함은 자명합니다.
따라서 반환 클래스만 선언해주면 바로 사용할 수 있도록 최적화해보고자 합니다.
그를 위해서 먼저 아래 코드와 같이 어노테이션을 선언해줍니다.
이후 Reflection API를 활용하여 반환 타입 클래스에서 필드의 정보와 해당 필드에 만들어준 어노테이션이 붙어있는 경우, description을 추출하여 요청시 사용하도록 해줍니다.
또한 동적인 json 형태를 만들어주어야 함에 따라서 기존에 사용하던 response_format 을 Map으로 변경하여 동적인 형태를 가질 수 있게 해줬습니다.
    public <T> T callOpenAiApiStructuredResponse(String systemMessage, String userMessage, Class<T> responseType) {
        List<OpenAiMessage> messages = List.of(
            OpenAiMessage.builder().role("system").content(systemMessage).build(),
            OpenAiMessage.builder().role("user").content(userMessage).build()
        );
        Map<String, Map<String, String>> properties = extractProperties(responseType);
        OpenAiRequest openAiRequest = OpenAiRequest.builder()
            .messages(messages)
            .response_format(getArticleFeedbackResponseFormat(responseType.getSimpleName(),properties))
            .build();
        OpenAiResponse openAiResponse = getOpenAiClient().post().body(openAiRequest).retrieve()
            .onStatus((status) -> {
                if (status.getStatusCode().isError()) {
                    System.out.println(String.format("Open AI 통신 에러 : %s %s", status.getStatusCode().value(), status.getStatusText()));
                    throw new RuntimeException("Open AI 와의 통신에 실패 했습니다.");
                }
                return false;
            }).body(OpenAiResponse.class);
        try {
            return (new ObjectMapper()).readValue(openAiResponse.getChoices().get(0).getMessage().getContent(), responseType);
        } catch (JsonProcessingException e) {
            throw new RuntimeException("반환 json 형식 오류");
        }
    }

    private <T> Map<String, Map<String, String>> extractProperties(Class<T> responseType) {
        Map<String, Map<String, String>> properties = new HashMap<>();
        Field[] fields = responseType.getDeclaredFields();
        for (Field field : fields) {
            OpenAiSchema annotation = field.getAnnotation(OpenAiSchema.class);
            String type;
            if (field.getType().equals(Integer.class)) {
                type = "integer";
            }
            else if(Number.class.isAssignableFrom(field.getType())) {
                type = "number";
            }
            else if(field.getType().equals(String.class)) {
                type = "string";
            }
            else if(field.getType().equals(Boolean.class)) {
                type = "boolean";
            }
            else {
                type = "string";
            }
            properties.put(field.getName(), Map.of(
                "type", type,
                "description", (annotation == null ? field.getName() : annotation.description())
            ));
        }
        return properties;
    }

    private Map getArticleFeedbackResponseFormat(String name, Map<String, Map<String, String>> properties) {
        return Map.of(
            "type", "json_schema",
            "json_schema", Map.of(
                "name", name,
                "schema", Map.of(
                    "type", "object",
                    "properties", properties,
                    "required", properties.keySet(),
                    "additionalProperties", false
                )
            )
        );
    }

    @Target(ElementType.FIELD)
    @Retention(RetentionPolicy.RUNTIME)
    public static @interface OpenAiSchema {
        String description();
    }
이제 이 최적화된 메서드를 사용하는 테스트 코드와 반환 클래스를 작성해봅니다.
    @Test
    void getArticleFeedbackWithAnnotation() {
        // given
        String systemMessage = """
                You are an expert in writing technical columns.
                Read the article and let me know what the writer needs to improve on in the article
                 and what parts of it would be good to study further.
                Answer in Korean. Answer with Markdown syntax.
            """;
        String userMessage = """
            <title>
            Prop Drilling in React: 데이터 전달의 딜레마와 해결책
            </title>
            <article>
            React에서 컴포넌트 간 데이터 전달은 기본적으로 props를 통해 이루어집니다. 하지만 애플리케이션이 커지고 컴포넌트 트리가 깊어질수록, 특정 데이터가 최상위(부모) 컴포넌트에서 깊숙한 하위(자식) 컴포넌트까지 전달되어야 하는 상황이 자주 발생합니다. 이때 여러 중간 컴포넌트들이 실제로는 해당 데이터를 사용하지 않음에도 불구하고, 단지 하위 컴포넌트로 props를 넘겨주기 위해 props를 받아야 하는 현상을 **Prop Drilling(프롭 드릴링)**이라고 부릅니다.

            Prop Drilling은 소규모 프로젝트나 컴포넌트 트리가 얕을 때는 큰 문제가 되지 않을 수 있습니다. 하지만 전달해야 할 데이터가 많아지거나, 컴포넌트 구조가 복잡해질수록 아래와 같은 문제점이 발생합니다.
            첫째, 코드의 가독성과 유지보수성이 떨어집니다. 데이터가 어디서 생성되어 어디까지 전달되는지 추적하기 어려워지고, 중간 컴포넌트가 불필요하게 props를 받아야 하므로 코드가 장황해집니다.
            둘째, 컴포넌트 간 결합도가 높아집니다. 중간 컴포넌트의 구조가 바뀌면 데이터 전달 경로도 함께 수정해야 하므로, 리팩토링이 어려워집니다.
            셋째, 성능 저하의 원인이 될 수 있습니다. props가 변경될 때마다 중간 컴포넌트들도 불필요하게 리렌더링될 수 있기 때문입니다.

            이러한 Prop Drilling 문제를 해결하기 위해 React에서는 Context API를 제공합니다. Context를 사용하면 데이터를 전역적으로 관리하고, 필요한 컴포넌트에서만 직접 접근할 수 있습니다. 그 외에도 Redux, MobX, Recoil 등 상태 관리 라이브러리를 도입하거나, children props를 적극적으로 활용하는 방법 등 다양한 해결책이 있습니다.

            결론적으로, Prop Drilling은 React의 데이터 흐름에서 자연스럽게 발생할 수 있는 현상이지만, 규모가 커질수록 코드의 복잡성과 유지보수 비용이 증가하므로, 적절한 상태 관리 전략을 도입하는 것이 중요합니다. Context API나 상태 관리 라이브러리를 통해 불필요한 props 전달을 줄이고, 컴포넌트 설계를 더욱 유연하게 만들 수 있습니다.
            </article>
            """;

        // when
        OpenAiArticleFeedbackResponse response = openAiClient.callOpenAiApiStructuredResponse(systemMessage, userMessage, OpenAiArticleFeedbackResponse.class);

        // then
        System.out.println("--- Feedback ---");
        System.out.println(response.getFeedback());
        System.out.println("--- FutureLearningStrategy ---");
        System.out.println(response.getFutureLearningStrategy());
        assertThat(response.getFeedback()).isNotEmpty();
        assertThat(response.getFutureLearningStrategy()).isNotEmpty();
    }

    @Getter
    @NoArgsConstructor
    public static class OpenAiArticleFeedbackResponse {
        @OpenAiSchema(description = "Parts that the author should correct in the article")
        private String feedback;
        @OpenAiSchema(description = "Parts of the text that the author recommends studying in more detail or for additional study")
        private String futureLearningStrategy;
    }
테스트 결과, 다음과 같이 response_format도 잘 들어가고 있으며, 반환값도 기대한 형식으로 반환되고 있음을 확인할 수 있습니다.

이로서 java를 이용해서 OpenAI API 기본 질의 부터 바로 비즈니스 로직에 적용할 수 있는 어노테이션을 이용한 구조화된 반환값 지정 방법까지 수행해봤습니다.
이번 포스팅에서는 Spring에 적용하는 부분은 생략하도록 하겠습니다.
여기까지 어렵지 않게 읽어주셨다면, Spring 을 이용해서 백엔드 비즈니스 로직에 적용하기 또한 쉽게 하실 수 있을것입니다.
회고
올해 초에 개인 프로젝트를 통해 LLM을 활용한 서비스를 개발해보고 싶어 SpringAI를 활용하여 서비스 구현을 했었습니다.
해당 프로젝트를 시작할 당시엔 LLM은 ChatGPT를 사용하는 정도였고, SpringAI에 대한 정보도 많지 않아 공식 문서를 보고 번역해가며 공부하며 LLM에 대해 공부해 나갔습니다.
그때부터 계속해서 관심을 가지며 공부해왔기에 이번 프로젝트에서는 RestClient를 통해서도 어렵지 않게 구현해낼 수 있었던것 같습니다.
이번 경험을 통해, 기회가 된다면 RestClient를 이용하여 SpringAI에서 구현했던 멀티 에이전트 서비스를 구현해보거나, 현 시점 가장 많이 쓰이는 LangChain을 이용해서도 LLM 서비스를 만들어보고 싶어졌습니다.
시간이 된다면 앞선 프로젝트에서 진행했던 Spring AI를 이용한 멀티 에이전트 개발기도 포스팅을 노력해보겠습니다.
래퍼런스
OpenAI Create chat completion API
OpenAI How to use Structured Outputs with response_format
'Spring > AI' 카테고리의 다른 글
| Spring AI : Retrieval Augmented Generation 번역 (0) | 2025.03.16 |
|---|